
Harami
Small body inside a big move
- By
- 42Fibonacci
- Updated
- Read time
- 9–11 min
A Harami is a two-candle reversal warning where a small second candle's body sits entirely inside the first candle's larger body. The Bullish version forms in a downtrend, the Bearish in an uptrend. It signals momentum slowing, not a reversal; a third close past the mother's open makes it a Three Inside Up or Down.
- Type
- Two-candle early warning
- Variants
- Bullish (after downtrend) and Bearish (after uptrend)
- Story
- A scream followed by a whisper — momentum cooling
- Cross variant
- Inside candle is a Doji — some read it as a fuller standstill
- Confirmation
- A later close above the mother's high (below its low for the bearish form)
- Stop
- Below the mother candle's low (above its high for the bearish form)
What Makes a Harami
The Harami is a two-candle pattern where the second candle's body fits inside the first candle's body. The first candle is large — continuing the prior trend. The second candle is small — open and close both contained within the prior body.
After a downtrend, that's a Bullish Harami — a large red mother candle followed by a small inside candle, hinting that seller momentum is cooling. After an uptrend, the mirror — a large green mother candle wrapping a small inside candle — is a Bearish Harami.
The name comes from the Japanese word for "pregnant" — the large candle is the mother, the small candle sits inside it like a child. The metaphor is apt: something new is forming, but it hasn't been born yet. The pattern suggests potential, not certainty.

- Mother candle
- Large candle continuing the prior trend — red in a downtrend, green in an uptrend. This is the context: momentum was clearly in one direction.
- Inside candle
- Small candle whose entire body is contained within the mother candle's body. Usually the opposite color to the mother; when both are red, the pair has its own name, the Homing Pigeon (both green: the Descending Hawk). Size and containment are what matter most.
- Containment
- The inside candle's body must not exceed the mother's body boundaries. Shadows may extend beyond, but the real bodies define the pattern.
How a Bullish Harami Forms
Every candlestick pattern tells a story about a shift in power. The Harami's story is quieter than most — it's about momentum fading, not momentum reversing. Here's what's happening session by session:
"Big red candle. Sellers are in total control. No reason to step in."
The first session is a strong bearish candle — a wide range, a close near the low, conviction selling. This is the trend doing what the trend does. Bears are confident, and the price action confirms it.
"Wait — that's it? After yesterday's move, this is all they could do?"
The second session opens inside the prior candle's body and trades in a much narrower range. Its body, open to close, stays inside the prior candle's body. The market that was screaming yesterday is suddenly murmuring.
"Momentum is fading. This doesn't mean it's reversing — but something shifted."
By the close, the inside candle is small, contained, and unremarkable. But that's exactly the point. After a big move, the market couldn't follow through. The Harami is a warning that the prior momentum may be slowing — not proof that it has reversed.
Here's the critical distinction most traders miss: the Harami is a warning that momentum is slowing, not proof that it has reversed. A trend can slow down and then reaccelerate. The Harami marks the pause — what comes after the pause is what determines the trade.
Think of it like a car approaching a stop sign. The Harami is the brake lights coming on. The car might stop. It might also just slow down and keep going. You need to watch what happens next before you step into the intersection.
Mirroring for the Bearish Harami: Flip the colors and the trend. Session one is a large green candle continuing an uptrend — buyers in total control, momentum carrying.
Session two opens inside the prior body and trades in a much narrower range. Its body stays inside yesterday's body. The rally that was screaming is suddenly murmuring.
Same lesson, opposite direction: buyer momentum is fading, but the trend hasn't reversed yet. The Bearish Harami is the brake lights at the top — what comes after the pause is what tells you whether the rally stalled or just caught its breath.
Is a Harami Bullish or Bearish?
Either — Harami is a family, and the prior trend sets the direction. A small candle tucked inside a large bearish body after a downtrend is a Bullish Harami; the mirror after an uptrend is a Bearish Harami. But hold the frame steady: in both cases the Harami itself signals hesitation, not reversal. The momentum that was driving the trend contracted for one session — that's all the pattern proves.
How reliable is it? We deliberately don't quote a win rate. The two candles alone don't settle the direction, in either form: a pause can also end with the trend resuming. For the bullish form, a later close above the mother's high confirms it and a close below the mother's low fails it; the bearish form mirrors both. Some traders accept a quicker, looser confirmation: a third candle that closes above the mother's open (below it, for the bearish form) turns the pattern into the Three Inside Up (or Three Inside Down). The Harami whispers, and the candles that follow decide whether the whisper was worth hearing.
The Harami Cross
There's a variant of the Harami that many traders watch for: the Harami Cross. This is when the inside candle is a Doji — a candle where the open and close are virtually the same price.
What sets it apart? A regular Harami shows reduced momentum, while a Harami Cross shows momentum that has come to a complete standstill. The market went from a strong directional move to absolute indecision in a single session — a more dramatic shift than a small-bodied inside candle. Either way, the cross still needs the same later confirming close; the Doji doesn't replace it.
In the case study below, you'll see a Harami Cross in action — a gap-up Doji that formed entirely inside the prior red candle's body. The combination of the gap (showing overnight sentiment shift) and the Doji (showing intraday equilibrium) shows both halves of that shift.
Three Inside Up and Three Inside Down
A Harami plus the candle that resolves it has its own name. After a Bullish Harami, a third candle that closes above the mother's open makes a Three Inside Up; the bearish mirror is the Three Inside Down. Traders disagree on how high that third close must be, and the choice changes your entry. The Three Inside Up & Down guide covers the three levels in use and how each is confirmed.
Bullish vs Bearish Harami
Same structure, opposite context. The deciding factor is the prior trend, not the colors of the candles.
Bullish Harami
After a downtrend, sellers were in control. A large red candle continues the decline; the next session opens inside that body and closes inside it too — a small candle sitting entirely within the prior one.
The market that was screaming yesterday is suddenly murmuring. Seller momentum is cooling — not reversed yet, but the conviction has drained.
Bearish Harami
After an uptrend, buyers were in control. A large green candle continues the rally; the next session opens inside that body and closes inside it too.
The follow-through never came — neither side could push the body outside the prior range. Same structure, same containment rule, same need for a later close to confirm the direction.
Harami vs. Lookalikes
The Harami belongs to a family of patterns that involve relationships between consecutive candles. Confusing them is common — and costly. The key differences are about which candle is bigger and how the bodies relate.
- Small candle inside large prior candle
- Warning signal — momentum cooling, not a confirmed reversal
- The inverse: second candle wraps the first
- Expansion, not contraction — the second side takes over
- Entire range (including shadows) inside prior bar
- Harami only requires body containment
The Harami and the Engulfing are inverses of each other — mirror images of the same two-candle relationship. In an Engulfing, the second candle overwhelms the first. In a Harami, the second candle retreats inside the first. One is expansion; the other is contraction. Both are two-candle reads, but they tell opposite stories about momentum: the Engulfing shows a takeover, the Harami only a pause.
The Inside Bar confusion is worth addressing. In Western technical analysis, an Inside Bar requires the entire range — including shadows — to fit within the prior bar. The Harami only requires body containment. A candle can be a valid Harami but not a valid Inside Bar if its shadows extend beyond the mother candle.
The Harami can also overlap with another two-candle pattern. If the small candle's low matches the mother's low, the same two candles are also a Tweezer Bottom: two sessions that stopped at one price.
How to Trade the Harami
The Harami demands more patience than most patterns. Because it's a warning rather than a confirmed signal, the trading approach needs to account for the possibility that the pause is temporary and the trend resumes.
Confirm the prior trend is real
The Harami only matters after a sustained move in one direction. You need multiple sessions of lower highs and lower lows for a Bullish Harami, or higher highs and higher lows for a Bearish Harami. Check that the mother candle is large relative to the recent range: a large mother candle shows a real move for the Harami to interrupt.
Check the relative size of the candles
The inside candle must be clearly smaller than the mother candle. If the two candles are similar in size, it's not a Harami — it's just two candles next to each other. The contrast in size is what shows the slowdown. The inside candle should look obviously "contained."
Wait for a confirming close
This is critical with the Harami. It only shows a pause, so you need a later close to confirm direction.
Watch the candles that follow. For a Bullish Harami, you want a close above the mother candle's high, on the third candle or a later one, as long as price holds above the mother's low. For a Bearish Harami, you want a close below the mother candle's low, as long as price holds below its high.
That close tells you the other side is actually following through on the pause — not just resting before the trend resumes.
Use the mother candle's extreme as your stop
The mother candle's extreme is your invalidation line — its low for a Bullish Harami, its high for a Bearish Harami. If price breaks past that level, the slowdown was just a pause, not a reversal. The mother candle defines the risk — accept it or skip the trade.
A stock has been declining for several weeks and now sits at a known support zone. A textbook Bullish Harami forms — a large red mother candle followed by a small green candle whose body fits entirely inside the mother's body. The third session opens slightly higher but fades, closing back inside the mother candle's body, below its open. No break of the mother candle's high.
Should you enter on the third-candle close?
No. The third candle didn't confirm — it didn't close above the mother candle's high, which is this guide's rule for a plain Harami (it didn't close above the mother's open either, so no Three Inside Up formed). The Harami signaled the pause, but the follow-through didn't arrive yet. Stay patient: the setup is still alive while price holds above the mother candle's low. If a later session decisively closes above the mother candle's high, that's confirmation. If price breaks the mother's low first, the pattern fails. The Harami requires a confirming close — without one, there's no trade.
Reading the Harami in Context
Four lenses show whether a Harami marks a real slowdown or just a quiet day: volume, structure, momentum, and the level it forms at. Each gets its own dedicated guide; this is the quick orientation.
Volume — did the pause arrive or get drifted into? The cleanest read is high volume on the mother candle followed by noticeably lower volume on the inside candle: aggressive selling simply dried up. If the inside candle also trades on high volume, the pause is contested, not clean — buyers and sellers fighting inside a tight range, which is compression rather than relaxation. Read the Candlesticks + Volume guide →
Structure — where on the chart did the Harami form? A Harami at the edge of a range — at support, a prior consolidation zone, or a moving average — is the market pausing exactly where buyers have shown up before. A Harami in open space, with no nearby level to anchor it, gives buyers no reason to defend that price, so read it as a rest stop until a close says otherwise. Read the Candlesticks + Moving Averages guide →
Momentum — was the dominant side already running out of fuel? A Harami when RSI is near oversold (or overbought, for the bearish variant) and the MACD histogram is already shrinking is two independent data points pointing at the same thing: the trend is losing steam. A Harami when momentum is still accelerating is a rest, not a reversal. Read the Candlesticks + RSI guide →
Levels — did the hesitation happen where traders are watching? A Bullish Harami in the Fibonacci golden pocket of a pullback is momentum stalling exactly where many traders expect the trend to resume — hesitation with a reason. The same pattern between levels is just a quiet session. Read the Candlesticks + Fibonacci guide →
Pattern tells me where to look, context tells me whether to act.
Seeing the Harami in Action: $AEP
Here's a Harami Cross that passes every filter — and shows up in a name that doesn't usually make headlines.
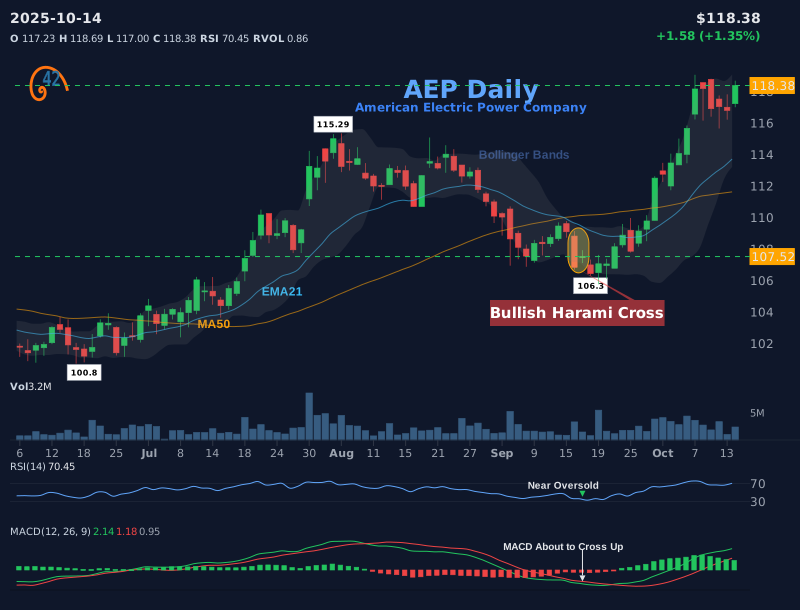
Before the Harami. American Electric Power ($AEP) had been sliding for multiple weeks, grinding lower from a peak near ~$115. No panic selling, no dramatic gap-downs — just steady, persistent pressure. By mid-October, price had worked down to a ~$107 area where buyers had shown up before, with RSI near oversold and the MACD histogram starting to flatten.
The Harami Cross prints. A long red mother candle continues the decline. The next session gaps up and prints a Doji entirely inside the prior body. The gap shows overnight sentiment shifted; the Doji close shows buyers couldn't push further. Decisive selling gave way to a complete standstill in a single session. That is a fuller stop than a regular small-bodied inside candle shows.
The follow-through. The sessions immediately after the Harami were all small-bodied — no decisive follow-through either way. The directional break finally came on the fourth session after the Harami, when a tall candle decisively closed above the top of the mother's body and broke out of the mother candle's range. The pattern was real; the confirmation just took patience.
Why this one was tradeable. Multi-week decline (real momentum to exhaust), ~$107 support zone (structure), Harami Cross variant (which many traders read as a fuller standstill than a regular Harami), RSI near oversold and MACD flattening (momentum confirmation). Stack those, and the pattern stops being a shape and starts being a setup. The advance that followed ran roughly ten candles back toward the prior ~$115 peak.
Common Harami Trading Mistakes
The Harami's subtlety is both its strength and its trap. Because the signal is quiet, traders tend to either ignore it entirely or overcompensate by treating it as something it's not.
| Mistake | Instead |
|---|---|
| Treating the Harami as a confirmed reversal See a Harami, assume the trend has reversed. Enter immediately and set a big target. | The Harami is a warning that momentum is slowing — not proof it has reversed. Wait for a confirmation candle before acting. A pause can also end with the trend carrying on. |
| Overlooking how dramatic the contraction should look The second candle is a touch smaller than the first — that qualifies. | The whole point of a Harami is the visual collapse from one session to the next: a full-bodied move giving way to something that barely moves at all. If the two bodies look comparable, the market hasn't paused — it's just had a slightly quieter day inside the same rhythm. |
| Expecting immediate follow-through The Harami appeared yesterday, so today should be a strong move up. | Momentum is slowing, not reversing yet. The Harami often needs multiple sessions to resolve. Expect a process, not an event. |
| Trading against strong accelerating trends Trade every Harami, even when the trend is getting stronger with expanding volume. | A Harami in an accelerating trend with rising volume may be only a rest before the next leg. Focus on Haramis that form after extended moves where momentum is already fading — not where it's still building. |
| Entering without knowing where the thesis is dead Take the trade, watch it develop, and react to price if it goes the wrong way. | If the mother candle's low gives way, the "pause" narrative was wrong and the downtrend is still in charge — no interpretation required. Nailing that exit trigger down before you commit capital is what distinguishes a framed trade from a hope. |
- The Harami is a momentum warning, not a reversal confirmation — the trend is slowing, not necessarily reversing
- The inside candle must be clearly smaller and contained within the mother candle's body
- Some traders read the Harami Cross (Doji inside candle) as a fuller standstill — momentum has come to a complete stop
- Read it in its context — at support with fading momentum, it marks a slowing move at a level; in open space, it is just a smaller candle
- Volume contraction on the inside candle confirms a genuine pause; high volume suggests contested, not clean
- Always wait for a confirming close — the Harami is too subtle to trade on its own
- Use the mother candle's low as your stop — if it breaks, the setup is invalid
Frequently Asked Questions
What is a Bullish Harami candlestick pattern?
A Bullish Harami is a two-candle reversal pattern in a downtrend. The first candle is a large bearish candle, and the second is a small candle whose body is entirely contained within the first candle's body. The name comes from the Japanese word for "pregnant." It signals that downside momentum may be slowing.
What is a Bearish Harami candlestick pattern?
A Bearish Harami is the mirror of the Bullish Harami, appearing in an uptrend. The first candle is a large bullish candle, and the second is a small candle whose body is fully contained inside it. It signals that upside momentum is stalling and may be reversing — a warning, not a confirmed top.
What is a Harami Cross?
A Harami Cross is a variant where the inside candle is a Doji — open and close virtually the same price. Some traders read it as a fuller standstill: momentum has come to a complete stop, not just a contraction. It still needs the same later confirming close as a regular Harami; the Doji does not replace it.
How is the Harami different from an Engulfing pattern?
They are inverses. In a Harami, the second candle is smaller and fits inside the first (momentum contraction). In an Engulfing, the second candle is larger and wraps around the first (momentum expansion). The Engulfing shows the second side taking over; the Harami only shows a pause, so it needs a later close to say which way.
How do you confirm a Bullish Harami?
Wait for a later candle, the third or one after it, to close above the mother candle's high. The Harami only shows a pause, so the pattern has no direction until that close. A confirmation candle with above-average volume adds conviction. If the third candle closes above the mother's open, that already forms a Three Inside Up, a looser confirmation some traders accept.
Where should I place my stop loss on a Harami trade?
Below the mother candle's low (including the shadow). This is the natural invalidation point — if price breaks below it, the momentum pause was temporary and sellers are still in control. Define this level before entering the trade so your risk is clearly framed in advance.
Does the color of the inside candle matter?
The inside candle can be either bullish (green) or bearish (red). A green inside candle is slightly more bullish because buyers managed to close above the open, but the key signal is the size contraction and containment — not the color. The inside candle's body should be clearly smaller and contained within the mother.
What is the difference between a Harami and an Inside Bar?
The Harami requires the inside candle's real body to fit within the mother candle's body. An Inside Bar requires the entire range — including shadows — to fit within the prior bar. A candle can be a valid Harami but not a valid Inside Bar if its shadows extend beyond the mother.
Is a Harami bullish or bearish?
It can be either — Harami is a family, and the prior trend sets the direction. A small candle inside a large bearish body after a downtrend is a Bullish Harami; the mirror after an uptrend is a Bearish Harami. Either way, the Harami itself signals hesitation, not reversal — a later close decides whether the pause becomes a turn.
The Bottom Line
The Harami teaches the skill of reading what's not happening. When a market that was moving aggressively suddenly gets quiet, that silence is information.
It doesn't predict direction. It doesn't confirm a reversal. What it does is flag the exact moment when the prior trend's momentum contracted — and that's the first step in any reversal process. Not the last step. The first.
When you see a Harami after an extended decline, at a clear support level, with volume contracting and momentum fading — you're seeing multiple independent signals converging on the same message: this trend is losing conviction. Whether that leads to a reversal or just a rest depends on what comes next. The Harami gives you the heads-up. Confirmation gives you the trade.